Buy Plumbing Online

    The Buy Plumbing Online Blog

    4 Reasons why your toilet might be leaking


    4 Ways to unblock your bathroom sink

    Second only in inconvenience to a blocked toilet is a blocked sink. It’s a hassle, it’s a mess and more often than not it requires human intervention to get it back to normal. If you have found yourself in the unpleasant situation where you’re faced with a blocked bathroom sink and don’t know how to unblock it then read on!

    How to unblock a bathroom sink using a plunger

    Now the plunger is the ye old faithful tool of plumbers the world over (just ask brothers Mario and Luigi). Relatively inexpensive and a bathroom tool staple everyone should own for scenarios just like a blocked sink, a plunger uses suction to move and shift a blockage that is located fairly close to the upper part of the waste pipe and the wielding of a plunger is usually the go-to first option for sorting a blockage.

     To create a suction powerful enough to shift the blockage you will need to seal any gaps so that the plunger can create a good seal around the sink plug hole, this may require you to use an old rag to block up the overflow hole etc.Once you have done this, place the plunger over the plughole taking care to ensure it has fully covered the entire plughole. Now it’s time for a workout - roll up your sleeves and start pumping up and down with the plunger (and don’t be shy about it!). Sometimes this can quickly shift the blockage, other times it may take a few minutes of arm work to move whatever is causing the blockage.

    When the blockage finally shifts, you’ll feel a change in the suction. If however this arm workout hasn’t yielded the desired unblocking results then it’s time to move onto plan B.

    How to unblock a bathroom sink using some wire

    If you’re encountering a blocked drain as a regular occurrence then it might be worthwhile investing in a pipe and sink cleaner tool (basically a long skinny coiled wire used to clean debris build up and minimise blockages). If however you don’t have one of these already then  a length of flexible wire like an unravelled flimsy old coat hanger will make do. Using the wire gently and carefully insert it into the plughole to disperse and break up the blockage. Sometimes gently curving the end of the wire into a small hook shape can help you to snag and lift out whatever may be causing the blockage. This is especially useful if the blockage is caused by a buildup of hair or a likewise substance. Just be extra careful whenever using wire or an object with a point as you don’t want to be too heavy handed and risk damaging the pipe or seal around the plughole.

    How to unblock a bathroom sink using pantry basics

    If the plunger and wire options have failed you and you’ve now moved onto plan C then it could be time to go for a tried and tested old fashioned cleaning hack using items found in most kitchen cupboards. For this you will need white vinegar and bicarb soda.

     Poor 2-3 tablespoons of bicarb soda down the plughole, follow this by pouring in a cup of the white vinegar. Adding these 2 ingredients together will cause a chemical reaction which results in a bubbling and fizzing of the 2 ingredients mixing together. This reaction will work to dissolve whatever is causing the blockage, but it requires some patience! Give it around 10 mins to work its magic.

     If after 10 mins you can tell right away that the blockage has been sorted then flush the area through with hot water. If however the blockage is still present try the wire method again as the bicarb soda and vinegar may have made it more susceptible to breaking up with a bit of encouraging prodding.

    Unfortunately if the plunger, the wire and the bicarb and vinegar haven’t brought you joy then it’s plan D - which is I am afraid to say likely to be a bit dirtier than the first 3 methods.

    How to unblock your bathroom sink by removing the U bend

    This is by far the most invasive and hands on method to unblocking your bathroom sink however on the plus side doing this means you’ve exhausted all avenues of clearing the blockage yourself before resorting to calling in a plumber. Whilst it isn’t complicated to do, it is messy and you will need to gather a few items together beforehand to make it as straightforward a task as possible.

    Items you will need before removing the U bend

    • Ensure you are wearing clothes you don’t mind getting dirty (and be sure they’re comfy too as you’ll likely be in an awkward position squeezed under your sink)
    • A bucket or large tub (whatever you have at hand, sometimes a big saucepan or large roasting pan will suffice in a pinch)
    • An old towel (don’t use your pristine white egyptian cotton as this is bound to get mucky, the older and more stained the better)
    • A wrench or adjustable pliers (also known as ‘water pump pliers’ to help you get a grip and unscrew the U bend)
    • Rubber gloves (a trusty old pair of marigolds is perfect) 

    How to remove the U bend

    • Clear out the space under the sink. This is going to get messy so you want to remove all items from under the sink so they don’t get wet and also so you have as much room to manoeuvre as possible
    • Use your phone to take a photo of how the U bend appears before you remove it. Taking a photo for reference will make it easier for you to put it back together the same once you’re done unblocking it
    • Place your bucket directly underneath the U bend to catch any water and debris
    • There is normally a threaded cap at either end of the U bend, gently unscrew these using your hands or the wrench depending on how difficult it is. Prepare for water to spill out when you do this, hence the importance of having a bucket poised and ready
    • Empty the contents of the U bend into the bucket and inspect it thoroughly to ensure there’s no obstructions left inside the U bend
    • Take the U bend to another sink or over to the bath and rinse it out. DO NOT RINSE IT IN THE SINK ABOVE (remember you just removed the U bend so turning on the tap above will flood the area below the sink so DO NOT USE THAT SINK)
    • Reassemble the U bend and screw it back into place. Screw the caps on straight and tight but take care not to overtighten as this could damage the thread. Just make it feel tight and secure with the caps on straight and you’re good to go


    Now in theory you should have successfully unblocked your bathroom sink (kudos to you!). Unblocking your sink can be a hassle, especially if you’ve had to resort to removing the U bend to do it. We know that sometimes, even with the best of efforts the sink might still be blocked, unfortunately that’s just how it goes sometimes. If this is the case then you’re going to have to bite the bullet and call in a professional, just know that you exhausted all avenues first before you did - so that’s something to be proud of for sure!


    4 Reasons why your toilet might be leaking


    A leak is never a good sign but a leak from a toilet can sometimes be particularly worrisome, however not all leaks are a sign of impending doom and gloom. In this post we are going to look at the most common reasons why a toilet might leak and what are the signs you should never ignore.


    If you have a misbehaving toilet at your place it could be a simple fix to get it back in line and operating normally as there’s some common leaks which are relatively easy to repair yourself if you have the right replacement parts at hand. However, if you suspect your toilet cistern is leaking but can’t prove it definitively, have a read of our post on 3 Ways to test if your toilet cistern is leaking. Want to learn the possible causes for your leaky loo? Read on!


    4 Common reasons why your toilet might be leaking

    Cistern keeps running as though toilet was recently flushed

    Does your toilet sound like it is constantly filling? Is there an ever present hissing sound from water topping up your cistern even though you haven’t flushed it? These are signs that could point towards there being a problem with the float valve or the float arm needing to be adjusted. The float valve is also known as a ballcock and is the mechanism that floats up and down with the water level in the cistern, when the cistern is full the float valve is at such a level that it will stop the flow of water to fill the cistern, subsequently if this is not working properly you may find your cistern is constantly filling.

    Trickling water into toilet bowl

    Are you noticing water trickling down the back of your toilet bowl even though the cistern is full and you haven’t flushed it recently? If you have experienced this then it can be particularly grating to learn that a leaky toilet can waste on average 5 full bathtubs of water daily - that’s a lot of water and money going down the drain. If the back of your toilet bowl has a slow trickle of water leaking from the cistern tank then it is possible you may need to replace your flapper. If you don’t address this, water will continue to enter the cistern and any overflow will be what you see trickling down the back of your bowl.

    The toilet is ‘sweating’

    When you’ve been running, you get sweaty, a sweating toilet is an indicator that it is running correctly… Just kidding! Describing a toilet as sweating certainly sounds strange but what this is simply referring to is the condensation that has collected on the outside of your cold porcelain toilet. This is often more so in the colder months (think of condensation on windows in winter), however there are steps you can take to minimise this from happening. Lowering the level of moisture in the air through using an exhaust fan, opening a window to let cool air in and steam out and having cooler showers are all ways to lessen the likelihood of a sweaty toilet.

    Toilet is leaking at the base near the floor

    Is your toilet leaking from the base? Does a small pool of water gather at the point where your toilet touches the floor? If this sounds like your misbehaving loo then the seal under your toilet may have failed. A toilet is a fixed object in your bathroom but through use over time it may shift and start to wobble. Sometimes a simple tightening of the bolts that hold the toilet to the floor can fix this seal back into place but if it has been wobbling for some time then it could have exacerbated the deterioration of the toilet seal that connects the toilet to the floor. It is important to mend this as soon as it is identified as a wayward leak can often turn into a more serious (and more expensive) fix the longer it is left unaddressed.


    If your toilet is experiencing a leak, no matter how small, it is important to identify the cause and rectify it as quickly as possible. We have an extensive range of toilet parts and spares for you to fix the smaller leaks yourself. Some leaks like those mentioned above can often be easy to fix with a bit of help from the internet but other more serious leaks are best left to the professionals before the situation deteriorates into something worse than a simple trickle of water.


    Reasons why your boiler is making noises


    Are you a DIY-er that is looking to build your own home DIY plumbing repair kit? Tackling small plumbing repair work like leaky taps and running toilets doesn’t always need the call out of a professional tradesperson. With determination, some graft and a correctly stocked home plumbing repair kit you can tackle these tasks yourself. Plus a job completed on your own can earn you a sense of satisfaction that paying someone just doesn’t give (also extra pennies in your pocket is always a welcome bonus to a job well done).


    It may surprise you to see that we haven’t included the trusty old cliched plunger in our must have tool list - worry not! We will show you on the blog later on just how you can (in a pinch) unclog without a plunger, so with that said let’s dive into what we’ve included on our must have home DIY plumbing repair kit list and exactly what each item does.


    The top 10 items and what they do


    We have listed the essential must have items below. We have given a brief explainer of what they’re used for so you can understand exactly why they have made the list of his essentials. If you’re needing any of these items you can purchase them from us via our website, over the phone or just pop in store to our trade counter and we’ll be happy to help you get kitted out for tackling your next home DIY plumbing project.


    1. Box of tap washers (mixed sizes)

    Now this one is fairly explanatory, often the cause of a simple drip can be fixed with the replacement of a washer. Taps and pipes come in different sizes, hence the need for different washers. Having a small variety on hand in your kit is essential and a tap washer variety box is ideal.


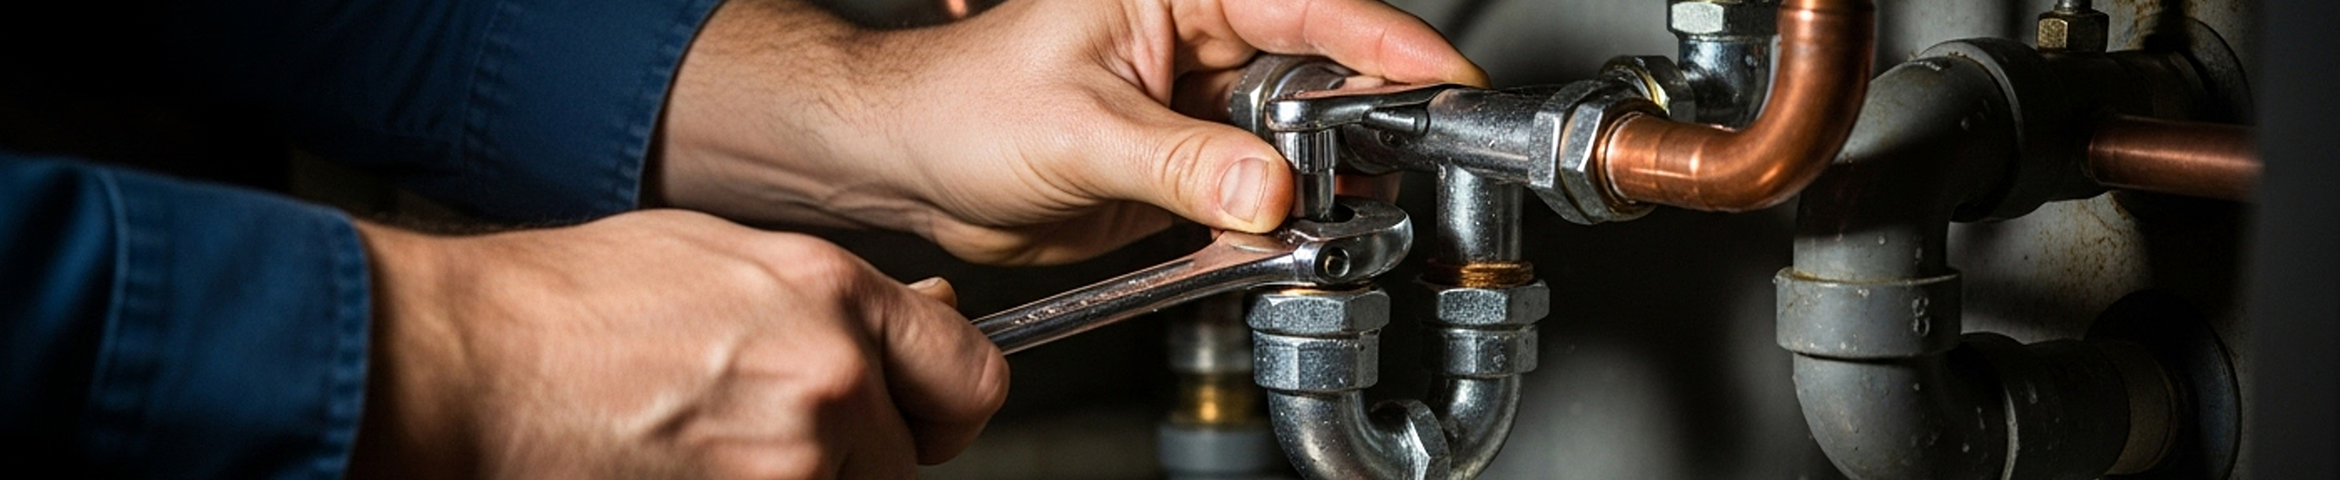
    2. Adjustable Spanner

    Ahh the trusty old adjustable spanner has many names… adjustable wrench, shifting spanner or the simple ‘shifter’ for our down under mates. This tool is used to loosen or tighten a nut or bolt and no reliable DIY kit of any kind is complete without one.


    3. Water Pump Pliers

    Like the spanner this has many names depending on where you're located. Also known as water pump pliers, adjustable pliers and my Dad’s fave Multi-Grips. They are commonly used for turning & holding nuts & bolts, gripping irregularly shaped objects, holding pipes etc. They hold all kinds of items with larger diameter too, regardless of whether they are round, square or hexagonal - hence their often used name of Multi-Grips.


    4. PTFE Tape

    The long winded technical name for the stuff is polytetrafluoroethylene but it’s most commonly referred to as plumbers tape. It’s white and comes wound on a small spool which makes life easier when winding round awkward and fiddly pipes and joints. It’s used to help with creating a nice tight seal with pipe threads. The spool also comes with a removable cover/case to keep it safe when not needed, don’t turn up to any plumbing project without it. 


    5. Solvent Cement

    In layman's terms is essentially plumbers glue and also known as PVC cement. Different pipes require different compounds or adhesives to glue them together, solvent cement is primarily used on PVC and uPVC pipework. When connecting these pipes the joints are not exactly glued together, but fused or bonded via a melding chemical reaction to produce superior adhesion and waterproof bonding.


    6. Pipe Jointing Compound

    You may have on occasion heard a plumber mention ‘pipe dope’ and wondered what they’re on about, rest assured it’s not something acquired in a dark alley, it’s just plumbers slang for pipe jointing compound. It’s a gooey adhesive that expands inside the pipe to prevent leaks. It’s a pretty useful goo as far as goos go in that as it never fully dries, the nature of it means it will form a fast, flexible seal which is guaranteed to last for years.


    7. Pipe Cutters

    The function is in the name - pipe cutters for cutting pipes! Besides producing a nice neat and clean cut, this tool is often a quicker and more convenient means of cutting pipe than using a hacksaw but all of this of course depends on the metal of the pipe needing cut.


    8. Small Hacksaw

    Sometimes referred to as a mini-hacksaw or a junior hacksaw in some places, this is handy for cutting fiddly things in often tight and awkward spaces (think undersinks and the like). The most common materials you’ll be cutting into with this is copper and other metals along with PVC, wood and plastic tubing. You’ll often find they’re sold with a packet of replaceable blades which can also be purchased separately if need be.


    9. Screwdriver Set

    As essential as a hammer and measuring tape - you should already have a set of these in your all round DIY home tool box but if you don’t already, investing in a quality set will be a wise decision that your future self will no doubt thank you for.


    10. Utility Knife*

    Also known as a Stanley knife, you’ll reach for this more than you’ll expect. A trusty tool that is in every respectable tool box, this isn’t limited to cutting things related to just plumbing projects - you’ll be using it on all sorts of jobs so if you haven’t already got one it’s time to invest!
    * Unfortunately we are unable to ship Utility Knives due to postal restrictions, however they are available from our counter, give us a call on 01862 808040.


    Reasons why your boiler is making noises


    Your boiler is usually something that is out of sight and out of mind, so long as it’s working like it should then life continues happily and hot water flows without interruption. But if your boiler should start making funny sounds or emit noises that start to catch your attention then it’s a sign that things aren’t as they should be and you should probably investigate to get it sorted by a professional sooner rather than later.

    Before delving into the possible causes for your boiler’s funny noises we want to reiterate the importance of safety and that you must not go opening up or messing about with the components or inner workings of your boiler - leave that sort of thing to the professionals. Not only is messing about with a boiler dangerous (hello electricity, hot water, gas!) but tampering with your boiler if you’re not formally qualified to do so could seriously jeopardise any warranties or guarantees you may have with your manufacturer. So please do not attempt to perform any repairs that you are not qualified to do, instead utilise the information in this post to help ascertain the cause of the noise so you can better convey the problem to your repair person.

    Pinpoint where the noise is coming from

    First thing’s first, identify the source of the sound. This seems simple enough but if your boiler is part of a central heating system then the noise could be coming from anywhere in that system, travelling along the network of pipes and vents throughout your property. You’ll need to do some listening and detecting to determine whether the sound that is causing you concern is coming from your boiler, a radiator or a central heating pipe. Pinpointing exactly where the noise is coming from will help you to narrow down the cause.

    The boiler is definitely making funny noises

    If you have narrowed it down to the boiler definitely being the source of those concerning noises then it’s time to troubleshoot some potential causes (and remedies) to your noisy situation. It’s important to remember that your boiler is a working machine so some sounds are to be expected, but if your boiler has begun making noises that are either unfamiliar, louder than you’re used to or anything that is out of the ordinary to what would be expected from a healthy boiler then there’s a list of things to check and do before phoning for some professional advice.

    Review the water pressure

    If you hear a gurgling sound that isn’t the norm then check your water pressure as water pressure that is lower than the optimum operating level can cause your boiler to gurgle abnormally. Check the manometer (that’s the water pressure gauge) to see if the pressure is at the correct level. You’ll find this gauge usually near where the mains pipes connect to the boiler. If the pressure is too low there is sometimes a way to easily repressurise your boiler - consult your boiler manual and follow the steps outlined within the manual if this is safe for you to perform yourself. If this seems a bit more complicated than what you’re confident to do then it is best to consult the service of a qualified engineer.

    Airlocked

    Your system might be airlocked, in which case bleeding the system will help. Bleeding the system sounds a bit barbaric but rest assured, it involves no blood (when done correctly). Bleeding the system simply means removing it of trapped air. Sometimes air pockets can occur and that can be the cause of the gurgling noises (cue the sounds of a grumbly belly full of wind). Trapped air in the system is a common occurrence and isn’t always a sign of some other serious impending doom. Furthermore the good news is that bleeding the system to remove the trapped air can be done without the need to phone in a professional and is actually probably something you should do annually before switching your heating back on after it has been dormant for a period of time.

    How to bleed your radiators

    1. Completely open all radiator thermostats and run your heating at maximum temperature for around 10-15 minutes with all radiators on full
    2. Turn the circulation pump off and wait until radiators have cooled down - this often takes around 30-60 minutes
    3. Bleed the radiator nearest the boiler using a bleed key or screwdriver until water comes out (repeat this step on every radiator you have connected to the system)
    4. Turn on the boiler and check the water pressure (exactly like we mentioned earlier)

    Must have tools for bleeding your radiators

    Inspect the circulation pump

    If you have done the above but you’re still hearing those noises then it is possible that there might be a problem with the circulation pump. In most instances, the noise will be caused by the pump operating at a speed above its normal rate. If your boiler has an option to slow down the speed of your circulation pump, this may fix the problem. But if it doesn’t then it’s likely best to phone in a professional to have them take a look at it.

    Vibrating or ‘whooshing’ coming from the boiler

    Loud noises and excessive vibrations can feel ominous (especially when your boiler never used to make these before, don’t pack your bags and run for the hills just yet though as the cause could be something easily remedied. It’s important to remember that noises and strange behaviour doesn’t always signify imminent danger however they still shouldn’t be ignored as what could be an easy fix now may turn into a major repair later if it is left unaddressed.

    Inspect the flue / ventilation vents

    If you find that your boiler is making a ‘whooshing’ sound or perhaps vibrates excessively like a top loading washing machine then it could be due to a blockage to the air intake. Do an inspection of the external pipe on the outside of your building to make sure there’s nothing obstructing it. Keep a lookout for debris like leaves, bird nests, fluff and the like and remove them immediately using a dry brush or hoover. Make sure you can detect some air movement by placing your hand over the vent after cleaning and inspecting. Take special care if your vent is up high and you need to use a ladder to reach it.

    Examine the air filter

    The air filter in a boiler is similar to that of air filters you find in cars and hoovers. Some boilers have user-serviceable air filters (this will be outlined in your manual) and owners are encouraged to regularly check and clean these (often just with the use of a simple household vacuum or dry brush). If however your filter isn’t meant to be accessed by anyone other than a professional then it’s best to leave it to a qualified engineer so just mention it to them when they come to your property and ask them to clean it for you during their visit.

    Buzzing or whining coming from the boiler

    Now this sound is a genuine red flag. A buzzing or whining coming from inside your boiler could be due to worn pump bearings, the fans vibrating or even a defective burner to name but a few possible causes. However the sound alone cannot pinpoint the exact issue and a professional will need to be brought in to diagnose the problem and get your boiler repaired. This is definitely something beyond the scope of a DIY enthusiast and something best left for a qualified professional.

    If you’ve stuck with us to the end of this article we hope you’ve been able to ascertain the cause for your noisy boiler and we hope you’ve maybe been luck enough to easily resolve it. If however you find yourself in the unfortunate position and still have a boiler emitting concerning noises then we strongly encourage you to seek professional advice. Your manual may have a consumer contact number listed where they can recommend a registered trade professional in your area or if it is an emergency check your home insurance policy to see if your boiler is covered in such instances. Remember that when it comes to boilers safety should always come first, never attempt repairs not recommended by your manual and never those outside your qualified skillset.

    Things to check if there's no hot water


    Hot water flowing from your taps on demand is a convenience we seldom think twice about until it’s not there when you need it. When the hot water in your home isn’t working like it should there are several reasons why. In this blog post we are going to explore the most common domestic hot water problems. Knowing what to check not only helps you to have a better understanding of how your system works but it can also help you to better convey the issue to the person you’re hiring to repair it if it is something you can’t address yourself. If you’re able to narrow down the issue for your repair person then it means shorter time spent on the job diagnosing the issue which in turn could save you money in repair costs.

    What you should check first if there’s no hot water

    Check your hot water source

    So first things first, check your hot water source such as your boiler or your hot water heater to make sure it is working correctly. Modern units tend to have a digital display to indicate the state of the system, if your boiler isn’t working it will likely display an error code on the display panel to indicate as such. If you’re unsure what the code on the display panel means, refer to the unit manual for your boiler or hot water heater. If by chance you’re like many folk who can’t find the manual when you desperately need it (don’t worry - you’re not alone) thank heavens for the internet! A quick Google search of the error code and the model of your boiler or hot water heater will generally yield results. The good news is that some fault codes can be easily fixed without the need to phone in a professional, a simple boiler reset could do the trick (just check what the manual says).

    If however you have an older boiler or hot water heater, then a display screen might not be present to tell you precisely what is wrong. If this is the case - there’s some telltale signs that indicate there is a serious issue which may be the source of your hot water troubles. These can be signs of leaking, smelly or discoloured water coming from your taps, varying water temperatures or pressures and strange noises (like a popping or rumbling sound).

     If you should have an old school electric hot water heater it’s also important to consider whether one or both of the immersion elements have failed. The elements are the parts of your hot water heater that heat the water (just like in our electric kettles). Several issues can arise over time that can cause these elements to fail but the most common ones are mineral deposit build up, power surges and old age / wear and tear.

    Qualified tradespeople have devices and techniques to test exactly what is going wrong with your boiler or water heater so it’s a good idea to leave it to the professionals (it’s also a safer option too).

    Check your utilities

    If after checking your hot water heater and boiler you have found that everything looks normal but there is simply no power it could just be a power issue. Check to make sure that you have working utilities like gas and electricity. Sometimes if the mains supply is interrupted it can cause issues within your own property so be sure to check that your main fuse box looks normal as a recent power cut could have affected your boiler settings. If you find that your power utility is experiencing an issue with supply, an easy way to see if there is an outage or interruption in your area is to hop onto social media sites like Twitter to see if your provider has tweeted an update. Checking social media is a good way to see updates from your providers, especially if you’re having trouble getting through via phone.

    Check your water supply

    Checking your water supply might sound simple enough but in the excitement (and panic) of having no hot water you may forget to check you have any water at all. If you have a traditional system (with a tank in the loft) be sure to inspect that it is filling with water correctly from the mains. If you discover that it has run dry then it won’t be able to feed any water into your hot water tank to heat for future use. If your feeder tank is empty, inspect the ballcock to make sure it isn’t obstructed or getting stuck which is often a simple reason that prevents the feeder tank from filling.

    Check the diverter valve

    If you have a combi boiler and all looks as it should and you have no issues with supply to your property from your utilities then it could be that your diverter valve is the issue. The diverter valve is always worth checking as it is the component of your central heating system that diverts water flow between heating your property and feeding hot water to your taps. In these instances you may find you’re stuck on one or the other and can’t get hot water without turning the heating on and vice versa. So be sure to check the diverter valve to see if it is the culprit for your hot water woes. We sell a range of replacement parts for your diverter valve whether you need to change the actuator as the motorised head has failed or if you’re needing a new valve body altogether. We have a range of products by leading industry makers like Danfoss and Drayton.

    Check your boiler pressure

    If the pressure is low… it may affect the flow! Low water pressure can cause issues with your hot water supply if you have a combi-boiler responsible for the hot water in your property. On a standard domestic boiler the water pressure is usually around 1.5 bar and this will be clearly displayed on a gauge called a ‘Manometer’. More often than not you will find the manometer located near where the water supply pipes connect to the boiler unit. Should your pressure be below normal operating level then it’s best to check your boiler manual to see if it outlines steps for you to easily re-pressurise the system. If it doesn’t, or if it looks like something a bit more complex than you were expecting then it’s worthwhile seeking the advice of a qualified engineer.


    Think you’ve pinpointed the issue with your hot water heater and need to purchase some parts or spares to finalise the repair? We have you covered! We have an extensive range of heating parts and spares online for a wide variety of boiler and water heater makes and models. So whether you’re looking for a part to repair the fault yourself or your heating engineer has given you a part number to source, we at Buy Plumbing Online are ready to help you out.

    Maintenance tips to prepare the outside of your home for winter


    Winter is coming! Words that are sadly relevant anytime of the year in the UK (especially if you happen to live up North or pretty much anywhere in Scotland for that matter). The thought of winter’s arrival conjures up images of cold, wet, grey days spent shivering outdoors, cursing the neverending amount of leaves building up, dreading the cost of heating your home and just generally feeling all out gloomy… BUT! Never fear because our winter preparation series is here! And in this series we will give you easy to action winter preparation tips so that the cold dark days ahead are more enjoyable and a bit brighter even if the weather is not. Today we are kicking off the winter preparation fun by tackling the great outdoors and focussing on the outside of your property.

    Ensuring the gutters and drainage around your property are healthy and clear of blockages is especially important if you live where falling leaves are a nuisance, snow is likely during the colder months or you frankly like the cold weather to stay where it belongs… outside! And while we are talking about gutters and drainage, don’t forget your roof and your chimney while you’re up the ladder. Keeping those things in good condition is paramount to keeping everything underneath warm, safe and dry in Winter.


    Keeping the external parts of your property in tip top shape is simple with regular maintenance. Just check out our actionable tips below to get the outside of your place winter ready over the weekend!


    Our top tips to get the outside of your property winter ready


    Clean & Clear

    You’re going to need to get your ladder out because the first and most obvious step is to clean your roof, gutters, downpipes and drains of any and all debris! Scoop out all those leaves and remove any moss or vegetation that may have made itself comfy on your home and ensure there’s nothing impeding the flow of water down and away from your property. Seems obvious but you’d be surprised how many people forget to just roll up their sleeves and clean clean clean!


    Visual Inspection

    Put your glasses on and get inspecting! Go out and look for cracks or leaks, get a small mirror and check behind the downpipes and fascia, check these on a rainy day as that’s the best time to spot leaks that would otherwise go unnoticed. It’s also important to ensure your gutters are aligned to allow water to run off correctly to avoid standing water in your gutters. Standing water when turned to ice during a cold snap can crack and break your gutters leading to even pricier repair work in future. If however you discover a leak in your roof, it might be worthwhile to get a reputable roofer in who can do a thorough inspection to see if it’s an easy fix and not something more serious - you don’t want to be dancing about on your roof without the right safety gear or clue on what you’re doing… some things are best left to the professionals.


    Repair & Replace

    Notice a section of downpipe or guttering that is beyond salvaging? Might be time to replace it completely, we have a range of gutter parts and spares to suit all manner of gutter styles. Alternatively we also sell a range of sealants and repair products to help you adequately address cracks and leaks in your guttering should the issue you have only need repairing and not a full replacement.


    Preventative Measures

    In most instances, prevention is better than a cure! Install some gutter brush to stop blockages in their tracks. These are helpful for allowing water to flow freely down and out while preventing leaves and other debris from clogging up your gutters. Needing to get your hands on some of these? We’ve got you covered for leaf guards and other downpipe balloon guards. Treat your roof with an anti-moss treatment while you’re up there to keep any future growth to a minimum.


    Tap Jacket

    These are small insulated and waterproof covers to protect your outside taps. Often an afterthought and something you wish you’d bought earlier in the year when you didn’t need it - a tap jacket can help ensure you have access to water from your garden tap even in the coldest of conditions.


    Grit

    If you’re fortunate enough to have smooth outdoor surfaces like a driveway or paths on or around your property and they’re your own personal responsibility then you may want to consider keeping an adequate supply of grit at the ready. You don’t want to end up a viral sensation thanks to videos of you slipping and sliding on the drive all because you forgot to buy some grit to de-ice the path when it gets frosty. Avoid the slip - buy some grit!


    We hope we’ve given you some ideas on actionable jobs you can tackle around the home to get winter ready this weekend! If you’ve got any questions about anything you’ve read above or perhaps you need help with any plumbing or heating projects at your place then give us a call on 01862 808040 and we’ll be happy to help in any way we can.


    Get your heating system ready for winter


    With the thought of winter’s imminent approach on the horizon our minds turn from keeping the house cool for summer to instead keeping it toasty and warm for the cooler months ahead - here we look at what you should do when turning on your heating for the first time.

    Now turning on your heating sounds simple enough, it’s just a flick of a switch… right? WRONG! Never assume it’s going to be as simple as that - if your heating has been off and asleep for the last several months then it’s going to need some waking up, just like we all do in the morning, your heating system is no different after waking up from a long slumber.


    Steps you should take when switching on your heating system for winter


    Get your boiler serviced

    A boiler service will help to keep your boiler in the best possible condition and keep it running as reliably and efficiently as possible - making sure it is ready for any weather. You give your car an annual MOT check so consider your boiler the engine for your home and pencil it in for an annual health check to make sure it’s operating correctly and any potential issues are detected and addressed as soon as possible.

    Bleed the radiators

    Not sure what bleeding the radiators means? Rest assured that this step requires no leeches and should be relatively blood free. Bleeding the radiators refers to removing any wayward air that may have made it into your system. You’ll need a towel or an ice cream tub or similar at the ready to absorb or catch any water that could come out as you’ll be bleeding air from the radiator. To do this you’ll need a radiator bleed key or a universal radiator & valve key.  

    Check the thermostatic radiator valve (TRV)

    What’s a thermostatic radiator valve I hear you ask? Well it’s that numbered knob thingy on the side of your radiator that you turn to change the flow of hot water to the radiator. If you’ve had a nice long warm spell and you’ve subsequently not used your heating and your TRVs have been closed for several months then it’s possible they could be stuck in that position and you may end up with a bit of a challenge on your hands to get them open again. If you find they’re stuck closed you can get them working properly by removing the TRV head from the valve body (sounds complicated but we promise you it isn’t!). Underneath you’ll find a small pin. Using the flat face of an adjustable spanner - like the ones in your home DIY plumbing repair kit (don’t worry if you don’t have any, you can get some here), use your spanner to push the pin and and check it is moving freely up and down so to ensure it can open and close like it should. Once you’ve got it freely moving again so it can open and close properly, replace the TRV head and you’re good to go! Happen to be in the market for a new TRV? Well take a look at the different styles we have online. We have a wide variety of thermostatic radiator valves to suit any taste or budget.

    Check your room thermostat

    Sounds fairly obvious but if it hasn’t been used for any significant period of time like a whole summer season then it’s worth checking. When it comes to older room thermostats you’ll likely find that when you open and close it you’ll hear a clicking sound - try this and keep your ear out for the tell tale click. If however you have a digital room thermostat skip this as you won’t be able to check it for the tell tale clicking sound as they don’t have it. Thinking you might be needing a new thermostat after doing your check? Well we’ve got you covered with a range of heating controls and thermostats online.


    Are you ready to turn your heating back on? I know we are! If however you have further Qs about anything you’ve read above or perhaps you have a query relating to heating that isn’t mentioned above, just give us a call on 01862 808040 - we’ll be happy to chat with you about all things plumbing and heating.


    Secure Payments

    Head Office

    Buy Plumbing Online
    Site 4,
    Blarliath Industrial Estate,
    Tain
    IV19 1EB
    United Kingdom

    Whilst every effort has been made to ensure the prices within this website are correct, prices charged will be those ruling at date of despatch. All prices quoted are inclusive of VAT. Errors & Omissions: Although care has been taken to ensure all information and images on this website are accurate, Buy Plumbing Online takes no responsibility for errors, omissions and product technical changes within the content of this website. Copyright © Buy Plumbing Online 2025. All rights reserved.

    Buy Plumbing Online, Registered number: SC236365. Registered office: Site 4, Blarliath Industrial Estate, Tain. IV19 1EB.